What is AFP page segment?
Page segments are collections of predefined data that can be merged with other data on a page when the page is printed. They generally are used to print signatures or logos. Page segments may contain either IM images, IO images, vector graphics, and, with some limitations, pre-composed text.
IM images are supported on all AFP enabled printers. An IM image object specifies the content of an uncompressed raster image and its placement on a page. It is resolution and orientation. However, when printed on a printer of a different resolution from the image, if the printer supports IO images, the IM image is converted to IO image and scaled to the printer's resolution. This is done for most 300-dpi printers when 240-dpi images are used.
IO images are supported only on the newer AFP enabled printers. An IO image object (also known as IOCA), also specifies the content of a raster image. However, the image is resolution independent and can be either uncompressed or compressed with one of the following compression algorithms: IBM MRR, RL4, ABIC, G3MR (CCITT T.4 G3) and G4 MRR (CCITT T.6 G4). If IO images are used for printers that do not support them, the images will be scaled to the printer's resolution, if necessary, and converted to an IM image at print time.
Graphics are supported on only the newer AFP enabled printers. They are not supported on old printers. A graphic object specifies the content of a vector graphic and it, too, is resolution independent.
If you already have your business logos or signatures in PC format, you can include these in overlays, or perhaps create them as a separate resource, i.e. an AFP page segment. Captured at a PC-attached scanner, they can be imported into a PC application and then “printed” as a page segment.
How to create AFP page segment?
1. Start your PC software (Here, we take Microsoft Access as an example)
2. Open a Microsoft Access database/document
3. Select from main menu "File"->"Print"
4. Select Printer "AFP Printer"
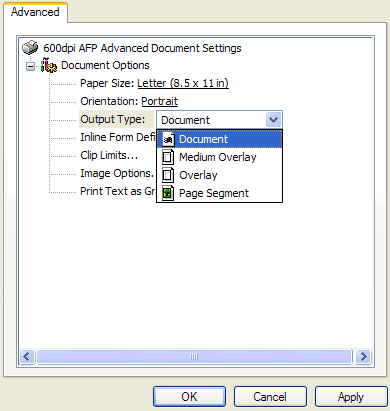
5. Click the "Property" button on the right, and the follow window appears,

6. Select "Page Segment" from the drop-down list of "Output Type"
7. Click "Apply" button and then click "OK" button to confirm your changes
8. For an image that occupies most or all of the page, leave the Top/Left and Width/Height settings at their default values. If you are producing a company logo or signature that typically occupies a small area of the page, you can place your logo in the top left-hand area of the page, and then change Paper Size to User Defined (for instance, 2.0 inches wide by 1.2 inches deep). This helps reduce the amount of surrounding white space you capture with the page segment and makes positioning it much easier.
8'. Alternatively, you can enter the coordinates of the top left-hand corner of the logo or area you want to capture in Top and Left in "Clip Limits..." options dialog, and change Width and Height as required (for instance, 2.0 inches by 1.2 inches). NOTE: This method does not work with certain Windows applications
8". Another method is to select the Partial Print option from your Windows application, which means that you print only an area of your spreadsheet or drawing, but not the whole area.
9. Click "OK" in the Print Dialog of Microsoft Access to confirm your "Print" command
10. A "Save-As" dialog will pop up, you can specify the folder and file name of the AFP document to be created.